Project Summary


- Mechanicals
-
The old Y-block and manual trans are being removed in favor of a Ford 302 / AOD combination. The rear end is an original heavy duty Dana unit with 4.25 gears.
- The Teardown
-
 Not a
whole lot of detail here. Just an attack with ratchets and
wrenches. Lots of labeled baggies for the groups of clips, bolts and nuts. I learned a long time ago to
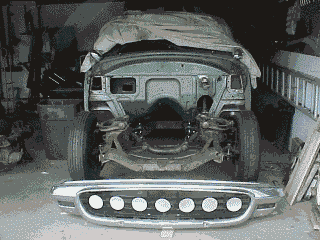
catalog the parts when you remove them. Make reconstruction way easier. Well, the front clip is off and the
individual pieces are apart and ready for cleaning and painting. The Y-block and trans are also out. The
firewall area has been stripped of all the gook and crud of the years. All of the front frame components
have been cleaned off too.
 - Reassembly
-
 This is the
reassembled front tub. This is the completed unit with the new 65 Mustang radiator mounted. It was mounted
using some fabricated filler panels to fill the area between the radiator hoop and the new radiator side
flanges. A trans cooler is planned but it's final configuration is not determined yet. The battery box mount
is being replaced by a 70 Mustang plate siamesed to the 54 mounting legs.
 - New Engine and Trans
-

 This
shows the new engine and transmission mounts I got in a kit from Butch’s Rod Shop. A simple redrilling
of the trans support bar will accommodate the AOD mount being a few inches farther back. We will see when we
mock fit the new engine / trans. Not earthshaking - just the normal street rod stuff. With the help of the
Butches Rod Shop kit the 302/AOD was slid into the engine bay with minor problems. The one interference
that we knew would occur was the trans fill tube and the firewall. A flexible unit will solve this
problem. Other than that everything else cleared and went in smooth.
- Engine Stuff
-
 In
keeping with my own personal likings we are holding to a traditional theme and are staying away from flashy
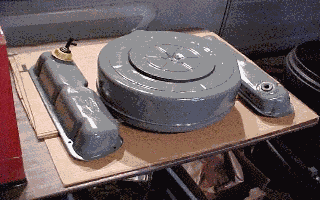
late model parts. The air cleaner is from a 55 / 56 Ford and uses a paper element. The valve covers are the
ones that came on the Merc motor so that's one less part to hunt down. I may change them later but for now
they are OK. I decided to give the valve covers and air cleaner a fresh coat of gray paint after stripping
them down. The front cover is a backdated 69 unit with a 70 waterpump and single V-belt drive.
UPDATE - I finally put my hands on an elusive 4-hole single groove crank pulley. While it does come on a Boss it turns out it is also used on the SBF F-series PU for way less! I used one on my 70 and now have acquired two more. Yea!
UPDATE - I changed out the water pump for a driver outlet unit to accomodate the staggered inlet outlet of the new direct fit 4-row aluminum radiator.
The exhaust manifolds and head pipes are parts that were removed from my 70 Mustang for a header system upgrade. They were in the shop so we gave them a try to see how they fit. They clear all the right stuff. The head pipe stubbs are from the removed factory y-pipe. A quick blast, some paint and they will have a new home!
- Chassis and Rolling Stock
-
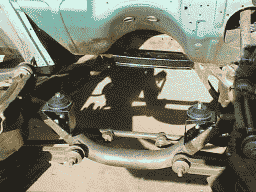
The suspension is lowered 4 inches all around using the classic lowering blocks in the rear and a cut coils in the front. This may be changed but the secret word is money! The wheels and tires are traditional with stock Ford 15 X 6 steelies and 670 X 15 wide whitewall tires. The wheel covers are a combination of the original 54 Ford beanie hubcaps with custom aftermarket chrome bullets added to the middle. Over the top of this combo are 55 T-bird wire wheel covers.
- Fuel System
-
 The parts are pretty straight forward. The pump is a stock 70 Ford F100 mechanical pump with an integrated
fuel filter.
- Gas Tank
-

 This is the gas tank after some energetic cleaning. It is in pretty good shape actually and so we are going to
use it instead of the backup plan of a Mustang drop in tank conversion. A coat of primer and a rust
resistant paint and we should be good to go. The only task left is to fabricate a new adapter ring to put
the new Sunpro sender unit (CP7583) into place.
 On to
the fuel sending unit. After a 2 hour brain lock as to how to adapt the 5 bolt sender ring to the 6 bolt
flange on the tank it dawned on me that the new sender stem was just bolted through the mount plate. After
unbolting the mount I fabricated a new round plate from flat stock using the factory 54 sender mount as a
pattern. The sender stem was then bolted to the middle of this new plate. I patterned and cut out some new
gaskets from sheet stock and the unit is now ready to go. We do tend to make some solutions more complicated
than they really are. To add an element of ignorence here there is an adapter available thru Speedway that
does this 6 bolt to 5 bolt thing. Oh Well!!
- Brakes
-
 This is
the new 67 Mustang drum brake master cylinder mounted in place. It was a traight bolt-in. I may include the
proportioning valve but we will see how the plumbing works out also. We stumbled upon a neat feature during
the install. It turns out that the pin that holds the rod to the 54 brake pedal arm has an eccentric feature
on it. And by a simple quarter turn of the pin the rod was right on. Ya learn something new every project!
- Inside
-
The interior is getting a minor rework with the conversion to a full 12 volt system from the 6 volt positive ground that came with it. The wiring system is being upgraded with a Painless Wiring harness kit. This change will also substitute a full set of VDO mini gauges for the dash idiot lights. The seats currently are recovered originals in a black and white insert pattern. This may be changed if time and finances permit, but is good for now.
- Dice
-
At many locations inside we have your dice. Lots of dice! Hence the name. Dash knobs, window cranks, locks, shifter knob and steering wheel spinner. It also has a pair of 6 inch dice imbedded on each door panel.
- The Body
-
The exterior has been modified with the shaving of the door handles and emblems. The visor is a Fulton unit and the full fender skirts are steel Foxcraft flush mounts. Vintage 50's accessory taillight extensions have been added to the rear. LED style inserts are being installed for safety reasons. The traditional triple outlet lakers and spotlights are also installed. The headlight trim rings are Caddy style Cobra accessory units. The rear has a NOS Coronado kit. You either like them or hate them but I have one.
Repairing the front fender lowers is about the only body work issue at ths time. Fabricating the lake pipe mounts and rocker panel trim. That kind of stuff still lurks in the wings.
- Color
-
Currently in prime the color will be a new close match recolor of the Killarny Green metallic - sort of an aqua color - which came on it. The body will be accented with some subtle Watson-style scallops. The layout is still in the development stages ( read that - can't agree on a pattern! But we are working on it. )